Lighting is everything to a camera.
Lighting is an important component of cinema’s visual design. Proper lighting is a necessity for cinematography and is one of the few areas of filmmaking that has infinite setup possibilities. The director of photography is usually responsible for lighting design on-set during filming days. While elaborate setups can be a bit difficult to grasp at first, overall lighting is easy once you understand the fundamentals.
Lighting sets the mood, making a scene dramatic, happy, or ominous depending on how you use it. Poor lighting could possibly mean more time in post-production trying to fix a problem - sometimes, you might as well reshoot the entire scene. Lighting can also direct (or divert) the viewers’ attention to (or from) what you want them to notice (or disregard).
The most basic and easy lighting technique is called the Three Point Lighting Setup.
Here is what a Three Point Lighting Setup is and how it can help your next video shoot.
- Key Lights
The Key Light is the primary light of the scene. It is usually the first one to be set up and is the most intense and direct light source of the subject or scene.
- Avoid placing your key light close to the camera. It will cause your lighting to become flat.
- If a key light is positioned to the side or back of an object, it will create a mysterious/dramatic mood, and overall keep the image dark.
- Fill Lights
A Fill Light is a supplementary light used in filming that does not change the character of the main light and is used primarily to lighten any shadows caused by the key Light.
- As the primary function of the fill is to remove shadows created by the key, it’s important that the fill remains indistinctive and does not create its own shadows. For this reason, the fill light typically is heavily diffused.
- Fills are easy to create even if you don’t have another light at hand. One method is to place a reflector (improvised or specialized reflective surface used to redirect light towards a given subject or scene) opposite the key. The light will spill onto the reflector and bounce up to your subject, creating a fill in the shadowed areas.
- Back Lights
A Back Light hits an actor or object from behind and is usually placed higher than the object it is lighting. It’s used to separate an object from a dark background, and to give the subject more shape. This helps bring out the subject and keeps it from looking two-dimensional.
- If a backlight is placed behind an actor at a directional angle, where the light hits part of the face, the backlight is now called a Kicker (light that strikes a glancing blow on the subject). This creates a highlight or gradient over a small area of the image in order to accent it slightly. In these cases, it’s good to use a diffuser, which breaks up light and distributes it more evenly.
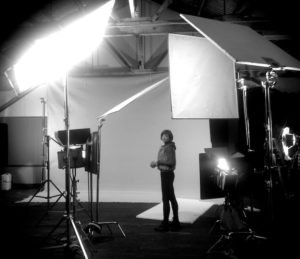
The key light, fill light, and backlight make up a Three Point Lighting Setup
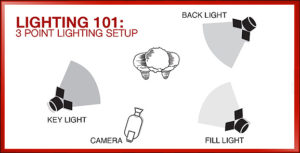
Note the diagram and the picture above. The Key Light in both scenarios is the main light, and as such has little to no diffusion relative to the other lights. The Fill Light has noticeable diffusion so that it slightly fills in areas that the main light alone has left dark, but does not over power the main light. The Hair Light is above and behind the subject so as to separate him/her from the background (visible through the camera’s lens), and typically has a bit more diffusion than the main light. See, not so difficult to grasp after all huh!?
(702) 897-4477
Tags: back lights, fill lights, film, key lights, lighting, set ups, three point, visual design